General info about Setting Up A Downrigger For Fishing
Images


Sources
More Sources With Info About Setting And Fishing
Down-rigging is that uses a cannonball attached to an electric or hand-powered winch to carry your fishing line. It also lures down to a particular depth that couldn’t be reached usually. Using down-riggers will let you to place your lures anywhere from five feet below the surface down to 250 feet 76. 2 m, and keep them there steadily. Before you start, your cannonball should be hanging over the edge of the ship near the surface of the water. (wikihow.com)
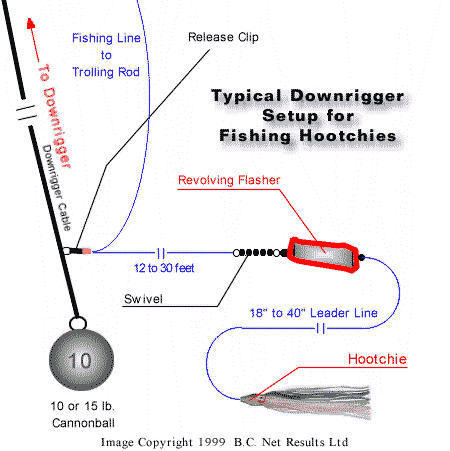
A Downrigger consists of a big reel loaded with wire; this wire is connected to a lead ball which comes in varying shapes. This ball features a short length of wire which is attached to a line clip. To rig a bait or tempt in a down rigger you start by letting your bait out behind the ship as it’s moving forward. Distance isn’t a big factor but you may be able to work on a basic rule of thumb that the shallower you fish the more back you may want to position your bait. Once it’s out behind the ship place the rod in your rod holder and put the reel in free spool with the ratchet engaged. If it’s a turn reel then simply back the drag off so that it’s quite loose. (cannondownriggers.com.au)
The downrigger idea isn’t new. In fact, primitive types of downriggers were used by Indians fishing the Great Lakes throughout the 1800s. The 1st true downrigger was a commercial rig patented years ago called the "Hirty-Girty". This rig was used on the West Coast for deep commercial fishing. It was not till the mid 1960’s throughout the inception of the Lake Michigan salmon fishery that the downrigger was effectively presented as a priceless sport fishing aid. Nobody is sure of the exact origin of the current downrigger, however it’s a recognized fact that the 1st designs comprised of window sash weights with trolling lines attached to a heavy line, and lowered to a wanted depth. (walkerdownriggers.com)
In the photo below, you may be able to see the QCOVE flasher on the top and a Hot Spot on the bottom that was changed to accept the QCOVE plug. If you’re like me, having many standard flashers and the availability of now being able to get reflective UV tape, gives you the chance to salvage some older working flashers. In making this modification, you have to get a nylon bushing at your local hardware store for under 25 cents. These bushings have to be 3/8" OD x 1/2" OAL x. 171 ID. You saw the rear metal ring out of the standard flasher’s plastic so you may be able to have a press fit of the bushing, then epoxy the bushing into this flasher. (leeroysramblings.com)
This is another one of those things that everyone has a different opinion, and they are all correct. Some favor mid ship downrigger placement like me, others like the transom. Wherever you place your downriggers your major consideration should be, ‘what will be my most productive area?’ and ‘how do I prevent time consuming tangles and other malfunctions?’After years of use, it was evident to me that my side positions just behind the wheelhouse were by far more productive than the gear on the transom. It wasn’t close. I was inquisitive about that, so I called some number of of my friends that run party boats for a living. (coastsidefishingclub.com)
When trolling for chinook around structure like points and kelp beds it’s probable that there will be a bunch of other boats trolling in the neighborhood and everyone will be circling around in a pretty predictable pattern. Once you catch a fish the best thing you may be able to do for yourself, and for the other anglers, is to keep your ship in gear and start to head the ship offshore. The chinook may take a run toward the shore but you don’t have to chase after it now, your reel will have around 900 feet of line or more. Usually you’ll be able to coax the chinook to turn around, then it’ll start following you offshore. (fishinbc.com)
Many walleye fishers use many downriggers to maximize their strike possible. When setting your downriggers, it is important to alter the depths of your weights to give the walleye a range of targets. Walleye feed up and from behind, if your walleye does not like one tempt, it may continue on to the next. Circling your ship in a figure-eight pattern will enable you to drop your bait down at different angles. Also, think about that ship speed, wind speed and current speed will all influence the angle and distance of your drops. (adventure.howstuffworks.com)
I have also used the device to understand what was going on underwater. Throughout one early September outing on a high mountain lake, I could see on the fish finder some scattered kokanee at 40 feet, and a whole bunch of kokanee at 60 feet. Attempt as I could, no kokanee may be enticed from the 60-foot depth. The kokanee at the 40-foot depth were the only ones that could bite. I set out the FishHawk TD to find out if temperature had anything to do with it. Sure enough, it did. The fish at 40 feet enjoyed a temperature of 54 degrees. The fish at 60 feet were at 44 degrees. The deeper fish were starting to settle in for the winter. (More info)
. I used 15 pound test for many years because I could fit 10 colors on a smaller level wind reel but at that I never had to go any deeper than 6 colors and it left me with 4 colors 120 ft for a “run”. But the 12 and 15 pound test lead line is hard to splice on new leaders after it was pulled tight some times. So I went back to the 18 pound test leadcore and have 6 colors and 175 feet of backing. I haven’t had to drop out more than 4 and a half colors when our trout go deep. Many new downrigger users that haven’t had experience with leadcore think we have to reel in too much line when a fish strikes. (eaglelakefishing.net)
We went out and crossed the bar straight out to get livies. It was a struggle to get any after an hour and a half we had enough for the day trolled around the gaol for some hours with nothing happening. We filled up and headed for fish rock, started to troll x-raps about 250m before, and on our 1st pass we had a double hook up on yellowfin. Lost 1 mid fight, and I lost mine right at the back of the ship it was a good fin around the 20KG mark disappointing but promising. Next pass we boated a nice mack tuna and for the next 2 hours it was mack after mack. After pulling in a mack I put the x-rap back out, and got smashed straight away by a small yellow fin of 7KG. (downriggershop.com.au)
Info Form
Optional category of interest:
Email:
Related Posts
- Huckleberry Fishing Lake Blisworth
What we found out about Huckleberry Fishing Lake Blisworth Images SourcesMore Sources With Info About…
- Fishing Reports For Horseshoe Lake Woodland Wa - Great new info
Fishing Reports For Horseshoe Lake Woodland Wa 2017 news: Fishing reports horseshoe lake trends: Reports…
- Horseshoe Lake Kitsap County Fishing
What we found out about Horseshoe Lake Kitsap County Fishing Images SourcesMore Sources With Info…